
Yield: one 8-inch torte
Recipe: 120/200
“Back to Baking”, pp. 168
This recipe is one that I have been avoiding for years. Every time I was looking for a beautiful and impressive dessert to make for a special occasion, I would look through the cookbook, come across the Dobos Torte and immediately think to myself that it looked way too complicated, so I would pass on it and do something else, something that was in my comfort zone. Again, looking for an elegant dessert, ideally a cake, to make for our New Year’s Eve party at friends’ place, I stumbled upon this recipe. This time, however, was different. I actually considered it. I pondered whether I could, this year, actually make the Dobos Torte. I read the recipe over twice, and decided that my accumulated skillset over the years should be sufficient to get me by. If not now, then when? The last day of the year, December 31st, 2019, was when I decided I was ready to finally make this beautiful cake.
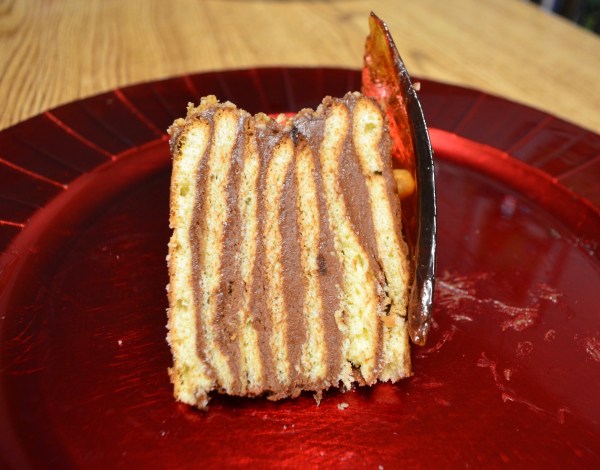
As Anna suggests for this recipe, definitely do leave yourself plenty of time to prepare, bake and assemble this cake. It takes much longer than you would think if you calculate how much time each component should take. Anna said it best: “As is the tradition with European tortes, they are as elaborate to make as they look.” I confess, this cake was not easy to do , but not impossible. It can be done! I had, however, a few obstacles and errors along the way, so I have added my own little faux-pas and tips to fix them in the recipe below. For example, you may notice that my cake has 7 layers instead of 9. That is essentially because I ran out of buttercream to coat the layers! And since the buttercream is more complex than a typical buttercream, I didn’t feel like and honestly did not have time to make another batch.
Ingredients for cake:
- 6 eggs, separated and at room temperature
- ½ cup + 5 tablespoons sugar
- 1 teaspoon vanilla extract
- 1 cup cake and pastry flour
- ¼ teaspoon salt
- ½ teaspoon cream of tartar
- 1 recipe Chocolate Hazelnut Buttercream *
Ingredients for caramel garnish:
- 1 ½ cups whole toasted and peeled hazelnuts *
- 1 cup sugar
- 1 tablespoon lemon juice
- 3 tablespoons water
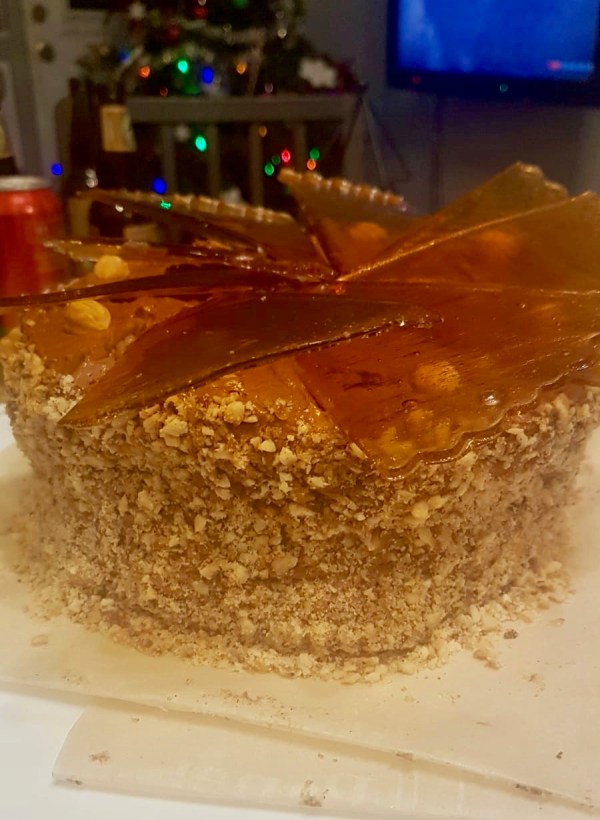
Overall, the cake looked very pretty, except for the oversized caramel decorations that were too thick. The taste and textures of this cake were also very appealing: the chocolate and hazelnut blended together very well, and the fluffy and soft cake was a pleasure to eat, especially with the crunchy caramel hazelnut crumble. The buttercream was a little bit too salty in my opinion, but mixed in with the cake layers and the hazelnut crumble it was still very pleasant to eat. I am sure that using the Frangelico hazelnut liqueur would not only add a great hazelnut flavour, but also balance out the saltiness a bit better. I recommend this cake for special occasions, if and only if you have many hours ahead of you so that you do not feel rushed and make mistakes. I suggest reading the recipe a couple of times beforehand to make sure that you have everything you need and you can plan accordingly. Good luck, and enjoy!
Directions:
- Preheat oven to 350°F. Grease and flour the underside of three 8-inch cake pans, tapping off any excess flour.
- I tried doing this for my first three layers and it did not work at all for me. Even though I greased and floured the pans very well, the cake layers stuck to the bottom of the pan and broke into several pieces when I tried to remove them. I found it easier to grease the bottom of the pan, add a piece of parchment paper cut into a circle the diameter of the pan, then grease and flour the parchment paper circle as you would normally. This resulted in thin cake layers that were easily removed from the pan without breaking. You can reuse the parchment paper for the other layers, simply grease it and flour it again.
- In a large bowl, whip the egg yolks with ½ cup of the sugar at high speed until they have doubled in volume and are thick and pale, about 5 minutes. Beat in the vanilla extract.
- Sift in the flour and salt, then fold into the egg mixture. The batter will be thick.
- In a clean bowl and with a clean whip, whip the egg whites and cream of tartar until they are foamy, then slowly pour in the remaining 5 tablespoons of sugar. Continue whipping at high speed until the whites hold a medium peak when the beaters are lifted. Fold in the egg whites into the yolk mixture in two additions.
- Spoon a bit less than ½ cup of batter onto the bottom of each cake pan and gently spread it to the edges, spreading it evenly as you do. Bake these layers for 7-10 minutes, until they turn a light golden brown. Let the cakes cool for about 5 minutes, then very gently remove them from the pan by carefully running a palette knife under the entire surface of the cake, working from the outside in. It’s okay if they have a few rough edges or a slight tear or crack, as they will all be covered in buttercream.
- Grease and re-flour the cake pans, and repeat Step 5 two more times for a total of 9 layers. Store the cake layers on a parchment-lined baking tray, separating them with parchment paper.
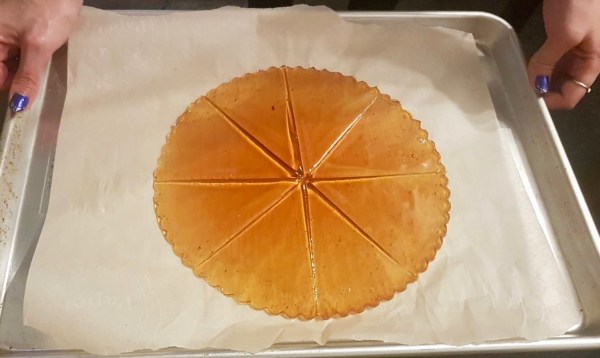
- To prepare the caramel garnish, place all but 8 of the hazelnuts onto a parchment-lined baking tray. Lightly grease a 6- or 8-inch cookie cutter (or the outside ring of an 8-inch fluted pan) and place on a second parchment-lined baking tray. Bring the sugar, lemon juice and water to a boil over high heat and boil, uncovered and occasionally brushing down the sides of the pot, until the mixture caramelizes, about 7 minutes. Carefully pour about half of the hot sugar into the centre of the cookie cutter, then pour the remaining sugar over the hazelnuts, and stir them to coat. Let the cookie-cutter ring set until almost cool, about 8 minutes, then remove the ring and with a greased chef’s knife, score the disc of sugar into 8 wedges. Cool completely. After the caramelized hazelnuts have cooled, pulse them into a food processor into a coarse crumble.
- Make sure to use a cookie-cutter or fluted tart pan of a proper size. I think 6 inches would be better than 8, as it might be easier to create the fan pattern without all the pieces overlapping in the middle. I made a mistake and used a 9-inch fluted tart pan, thinking that it was 8 inches, and so the pieces were too big and I had difficulty creating the pattern.
- Removing the cookie cutter or fluted tart outer ring from the almost-cooled caramel was easier to do than I anticipated. To score the caramel garnish, simply press down the knife to make an indentation, but not so deep that you cut the caramel. You must score it before it has cooled down completely, or it will break. I found the suggested 8 minutes to be a perfect time to do this.
- To assemble the cake, place one cake layer on a platter and cover it with a thin layer of buttercream, then top it with a second layer. Repeat this process until all 9 cake layers are used. Frost the top and sides of the cake, and press the caramelized hazelnut crumble onto the side of the cake. Arrange the 8 hazelnuts in a circle around the outside edge of the top of the cake, equally spaced apart. Carefully break apart the 8 scored caramel wedges, and rest each wedge on a hazelnut, angling them in the same direction so as to create a fan pattern. Chill the cake completely before slicing to serve.
- I sadly ran out of buttercream for the assembly. I spread what I thought was a thin layer of buttercream between each layer, but at my 7th layer I had barely any left, so I stopped adding layers and instead attempted to cover the sides of the cake with buttercream as best I could to make sure that the crumble would adhere. I had to really scrape the last bit of buttercream to make sure that I had enough. To prevent this, I would advise making 1.5x the Chocolate Hazelnut Buttercream recipe so that you don’t have to struggle with it. It is sometimes hard to see how thick of a layer of buttercream you are spreading, so this would give you more wiggle room.

* Tips from Anna:
- To be considered a Dobos torte, a Hungarian dessert, it must have a minimum of 5 layers, a chocolate buttercream and a layer of caramelized sugar on top.
- Give yourself ample time to make this torte. More than you think you need.
* Notes:
- I really did not have enough buttercream, even though I don’t think I slathered it on too thick between the layers. I had to reduce my cake to 7 layers because I did not have enough buttercream for the final two layers. Even doing so, I barely had enough to cover the sides of the cake to press the caramel hazelnut crumble into. To make sure you don’t run out of frosting for the very last steps of assembly after having spent hours making this cake, I would definitely multiply the Chocolate Hazelnut Buttercream recipe by 1.5x.
- I prepared 1½ cups of toasted and peeled hazelnuts and had a large quantity leftover after decorating the cake. I suspect that 1 cup would be more than enough.
Valerie
